Have you heard of Arbitrum Nitro? It is an optimistic-rollup stack that executes smart contracts efficiently while publishing transaction data and state claims to Ethereum. Its native execution and Wasm proving paths share the same state-transition logic. This article takes a detailed look at the 2022 Nitro design.
Since the publishing of this post Arbitrum has further solidified his position as a leading L2. Take a look at this analysis from Coingecko:

But let's start at the beginning...
What are Merkle Trees?
Merkle Trees are at the foundation of how this scaling technology works. At the root of the Merkle tree is the root hash. It's created by hashing all its original values as leaf nodes. Now two leaf hashes are combined by creating a new hash just for those together. We do this all the way until we have one tree with a single root hash. A Merkle proof now is a way for you to prove to someone who only knows the root hash that any value is in fact part of this tree as one of the leafs.
I wrote a long guide on Merkle Trees in case you want to dive deeper into the topic.
State of a smart contract
In Ethereum one Merkle tree is the state tree which contains all state like user ETH balances, but it also contains the contract storage itself. This allows us to create Merkle proofs on smart contract state!
So it's possible to prove a smart contract has a certain state using the Merkle proof mechanism. Keep that in mind for later.
How does Plasma work?
Plasma uses a combination of smart contracts and Merkle proofs. Together, these enable fast and cheap transactions by offloading these transactions from the main Ethereum blockchain into a plasma chain. In contrast to regular sidechains, you cannot run any smart contract in here.
In Plasma users send transactions between each other in UTXO style where the results of new balances are continuously updated in the Ethereum smart contract as Merkle tree roots. Once a Merkle root is updated in the smart contract, it gives users the security over their funds even if the plasma chain operator is malicious. The root encapsulates the result from many sent funds transactions. Should a Plasma operator submit an invalid root, users can contest it and safely get their funds back. For more details have a look here.
But as said before, it cannot run smart contracts. So no Uniswap with Plasma is possible.
Arbitrum: How to run a blockchain on a blockchain
But this is where Arbitrum comes in: general smart-contract execution in an optimistic rollup. Plasma is a helpful historical comparison, but the data-availability model differs.

The rollup executes transactions on L2 and commits to the resulting smart-contract state on Ethereum. It also publishes the transaction data needed to reconstruct that state; updating a Merkle root alone is not sufficient. Arbitrum One uses compressed batches posted through calldata or blobs.
Yes, this means we can run arbitrary smart contracts on Arbitrum! In very short, this is how it works:
- Represent the contract state with cryptographic commitments.
- Execute transactions on Arbitrum and publish their compressed batch data to Ethereum.
- Post state assertions that can be challenged through the rollup’s dispute protocol.
- Narrow an execution disagreement through an interactive process, then check the disputed step on Ethereum.
The contract excerpts below describe the original Nitro generation. Proof mechanisms and deployment parameters evolve; this article does not establish a current performance or security ranking against Optimism.
Now you might realize, this is where the scaling comes from. You only run transactions on layer 1 that are contested with a fraud proof. That’s the gain. So the scaling advantage comes solely from the fact that you won’t run 99.9% of transactions on layer 1.
Arbitrum Detailed Overview
The big ideas behind Arbitrum Nitro are:
- Sequencing
- Geth at the core
- Wasm for Proving
- Optimistic Rollups via Interactive Fraud Proofs
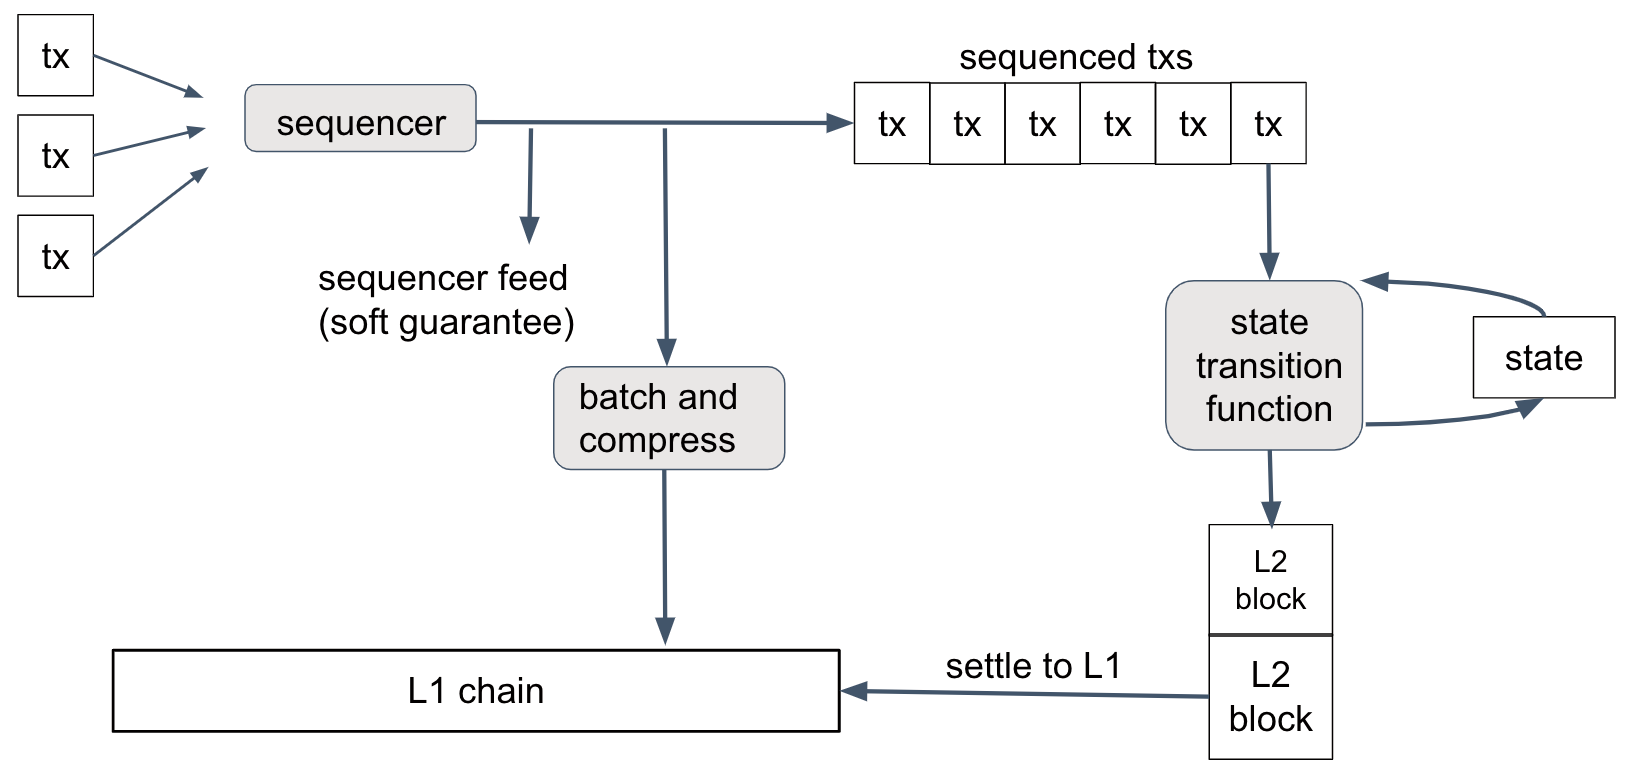
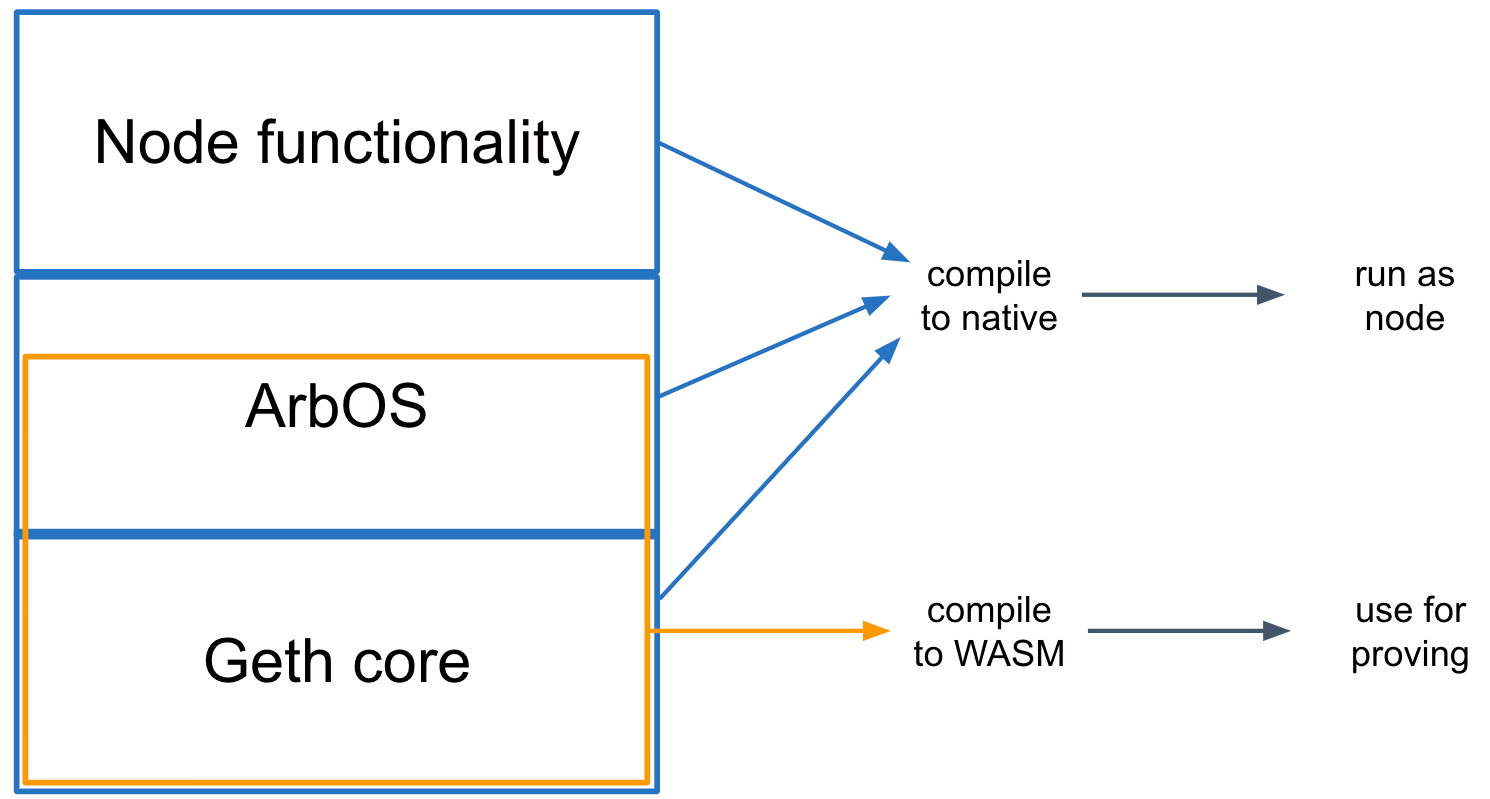
To actually run the transactions, we need native Geth, Geth with Wasm and Merkle Proofs. The architecture looks like this:
- On the highest level you have blockchain node functionality.
- ArbOS handling L2 functionlity like batch decompression and bridging.
- Core Geth EVM contract execution either native or via WASM.
How are transactions included?
New transactions can be added in three ways:
- Normal Inclusion by Sequencer
- Message from L1 included by Sequencer
- Message from L1 force-included on L2
1. Normal Inclusion by Sequencer
Historical context: The following source blocks are selected historical excerpts, with omitted statements and surrounding declarations. They explain the architecture and are not independently compilable contracts or a copy of today’s full deployment.
In the normal case the currently still centralized sequencer will add new messages to the inbox. This is done by calling addSequencerL2Batch. Here we check that the sender is the stored sequencer, only he is allowed to call this function:
function addSequencerL2Batch(
    uint256 sequenceNumber,
    bytes calldata data,
    uint256 afterDelayedMessagesRead,
    IGasRefunder gasRefunder,
    uint256 prevMessageCount,
    uint256 newMessageCount
) external override refundsGas(gasRefunder) {
    if (
        !isBatchPoster[msg.sender]
        && msg.sender != address(rollup)
    ) revert NotBatchPoster();

    [...]
    addSequencerL2BatchImpl(
        dataHash_,
        afterDelayedMessagesRead_,
        0,
        prevMessageCount_,
        newMessageCount_
    );
    [...]
}
And then inside addSequencerL2BatchImpl the bridge is called to enqueue the message to the inbox:
bridge.enqueueSequencerMessage(
    dataHash,
    afterDelayedMessagesRead,
    prevMessageCount,
    newMessageCount
);
Which then calls enqueueSequencerMessage in the bridge which simply adds a new hash to the inbox array:
bytes32[] public sequencerInboxAccs;

function enqueueSequencerMessage(
    bytes32 dataHash,
    uint256 afterDelayedMessagesRead,
    uint256 prevMessageCount,
    uint256 newMessageCount
)
    external
    onlySequencerInbox
    returns (
        uint256 seqMessageIndex,
        bytes32 beforeAcc,
        bytes32 delayedAcc,
        bytes32 acc
    )
{
    [...]
    acc = keccak256(abi.encodePacked(beforeAcc, dataHash, delayedAcc));
    sequencerInboxAccs.push(acc);
}
2. Message from L1 by Sequencer
Messages can also be added by anyone directly using calls in L1. This is useful for example when making deposits from L1 to L2.
Eventually this will call enqueueDelayedMessage on the bridge inside deliverToBridge.
bytes32[] public delayedInboxAccs;

function enqueueDelayedMessage(
    uint8 kind,
    address sender,
    bytes32 messageDataHash
) external payable returns (uint256) {
    [...]
    delayedInboxAccs.push(
        Messages.accumulateInboxMessage(
            prevAcc,
            messageHash
        )
    );
    [...]
}function deliverToBridge(
uint8 kind,
address sender,
bytes32 messageDataHash
) internal returns (uint256) {
return
bridge.enqueueDelayedMessage{value: msg.value}(
kind,
AddressAliasHelper.applyL1ToL2Alias(sender),
messageDataHash
);
}3. Message from L1 force-included on L2
There is one issue with the second case. A sequencer can take messages from the delayed inbox and process them, but he may also simply ignore them. In that case messages might not ever end up in L2. And since the sequencer is still centralized, there is a third backup option called forceInclusion.
Anyone can call this function once the delayed message itself has satisfied the required delay and inclusion conditions. The sequencer does not have to stop posting all other messages; selectively ignored delayed messages can also become eligible.
So why is there a delay at all and why not allow users always immediately to force include transactions? If the sequencer has priority, he can give soft-confirmations about transactions to users, leading to a better UX. If there would be constant force inclusions, the sequencer cannot pre-confirm to users what will happen. Why? Well, a force-included transaction may invalidate one that the sequencer was planning to post.
function forceInclusion(
    uint256 _totalDelayedMessagesRead,
    uint8 kind,
    uint64[2] calldata l1BlockAndTime,
    uint256 baseFeeL1,
    address sender,
    bytes32 messageDataHash
) external {
    [...]

    if (l1BlockAndTime[0] + maxTimeVariation.delayBlocks >= block.number)
        revert ForceIncludeBlockTooSoon();
    if (l1BlockAndTime[1] + maxTimeVariation.delaySeconds >= block.timestamp)
        revert ForceIncludeTimeTooSoon();

    [...]

    addSequencerL2BatchImpl(
            dataHash,
            __totalDelayedMessagesRead,
            0,
            prevSeqMsgCount,
            newSeqMsgCount
        );
    [...]
}
How do the Fraud Proofs work?
Let's explore how the frauf proofs of Arbitrum Nitro work in detail.
1. WAVM
New in Arbitrum Nitro is the WAVM. They basically re-use the Geth Ethereum Node code and compile it to Wasm (or rather a slightly modified version of Wasm). Wasm stands for Web Assembly and is an environment which allows running code regardless of the platform. So similar to the EVM, but without gas. It’s also a web-wide standard, so it has more support by other languages and better performance. So compiling the Geth code written in Go into Wasm is indeed possible.
How does this Wasm execution help us?

We can run proofs for it! Because it’s a controlled execution environment, we can replicate its execution inside a Solidity smart contract. That is the requirement for running fraud proofs.
So are we just running everything within the WAVM? Well Wasm is still slower execution compared to native compiled code. But here’s the beauty of Nitro: The same Geth code will be compiled to Wasm for the proving, but to native code for execution. This way we can get the best of both worlds: Run the chain with native performance, but still be able to execute proofs.
2. Fraud Proofs

Now let’s take a look how these fraud proofs work in detail. What do we need?
- We need a mechanism to get pre- and post-state of an execution.
- We need to be able to run the WAVM execution in a Solidity contract.
- We need an interactive mechanism to determine which execution step to prove.
The last step is optional, but a performance improvement if we only require a proof for one single execution. It does however require a few additional interactive steps between challenger and challenged node. We won’t go into the details for that, but you can read more about it here. And of course in the source code directly.
But we will go into detail about the other two parts now.
3. Get Pre- and Post-state of an Execution
During the interactive challenge, eventually the challenger will point down to a single execution disagreement. This single execution has a known pre- and post-execution state Merkle root hash. The post-execution hash is challenged, so in the end we will compare it to what we got from executing it ourselves. The pre-execution hash is not challenged and thus trusted.
It will be used to initialize the WAVM machine:
struct Machine {
    MachineStatus status;
    ValueStack valueStack;
    ValueStack internalStack;
    StackFrameWindow frameStack;
    bytes32 globalStateHash;
    uint32 moduleIdx;
    uint32 functionIdx;
    uint32 functionPc;
    bytes32 modulesRoot;
}
The challenger will initialize this machine with all the data.
In the contract we then only need to double check that this data represents the stored Merkle root hash:
require(mach.hash() == beforeHash, "MACHINE_BEFORE_HASH");Now we can also trust the modules root and use it to verify the modules data.
A module is defined as:
struct Module {
    bytes32 globalsMerkleRoot;
    ModuleMemory moduleMemory;
    bytes32 tablesMerkleRoot;
    bytes32 functionsMerkleRoot;
    uint32 internalsOffset;
}
This holds data in the form of further Merkle root hashes for WAVM machine data. And the challenger also initializes this data.
The contract again just verifies it with the previous modulesRoot:
(mod, offset) = Deserialize.module(proof, offset);
(modProof, offset) = Deserialize.merkleProof(proof, offset);
require(
    modProof.computeRootFromModule(mach.moduleIdx, mod) == mach.modulesRoot,
    "MODULES_ROOT"
);
And lastly we do the same again for the instruction data:
struct Instruction {
    uint16 opcode;
    uint256 argumentData;
}
And it will be verified via the functionsMerkleRoot:
MerkleProof memory instProof;
MerkleProof memory funcProof;
(inst, offset) = Deserialize.instruction(proof, offset);
(instProof, offset) = Deserialize.merkleProof(proof, offset);
(funcProof, offset) = Deserialize.merkleProof(proof, offset);
bytes32 codeHash = instProof.computeRootFromInstruction(mach.functionPc, inst);
bytes32 recomputedRoot = funcProof.computeRootFromFunction(
    mach.functionIdx,
    codeHash
);
require(recomputedRoot == mod.functionsMerkleRoot, "BAD_FUNCTIONS_ROOT");
So now we have an initialized WAVM machine and all that is left to do is execute this one single operation. This now depends on the exact instruction we need to run.
Take for example a simple addition. This is extremely simple:
uint32 b = mach.valueStack.pop().assumeI32();
uint32 a = mach.valueStack.pop().assumeI32();
[...]
return (a + b, false);
That’s basically it. Take the first two values from the machine stack and add them together.
Let’s look at another instruction. A local get instruction:
function executeLocalGet(
    Machine memory mach,
    Module memory,
    Instruction calldata inst,
    bytes calldata proof
) internal pure {
    StackFrame memory frame = mach.frameStack.peek();
    Value memory val = merkleProveGetValue(frame.localsMerkleRoot, inst.argumentData, proof);
    mach.valueStack.push(val);
}
The StackFrame comes from the WAVM initialization where we can find the localsMerkleRoot:
struct StackFrame {
    Value returnPc;
    bytes32 localsMerkleRoot;
    uint32 callerModule;
    uint32 callerModuleInternals;
}
Via the Merkle proof we retrieve the value and push it to the stack. Finally, this excerpt checks that the one-step result differs from the challenged post-state hash. The != condition below demonstrates disagreement; it is not an equality check accepting the challenged result.
require(
    afterHash != selection.oldSegments[selection.challengePosition + 1],
    "SAME_OSP_END"
);
Only if it doesn't match, the proof is valid and we continue. Now the challenger has won and a new post-state will be accepted.
How to implement on Arbitrum yourself
Arbitrum supports Solidity, with chain-specific environment behavior. The current Solidity support reference documents:
blockhashvalues are not suitable as secure application randomness.block.coinbasedepends on whether the message came through the sequencer or delayed inbox; it is not always zero.block.difficultyandblock.prevrandaoreturn1.block.numberestimates the first non-Arbitrum ancestor chain’s block number. It is distinct from the child-chain block number returned by RPC.- Contract senders arriving through the delayed inbox can be address-aliased.
Consult block numbers and time before carrying timing assumptions over from Ethereum.
How to use the Arbitrum networks
The current network reference lists Arbitrum One and Arbitrum Sepolia testnet, along with other Arbitrum chains. The original Rinkeby and Goerli onboarding links below have been retired. Wallet chain IDs use hexadecimal strings; adding and switching are separate requests.
Arbitrum One runs the Nitro rollup stack. The statement that only a testnet had upgraded describes an earlier rollout stage. For the currently supported networks and bridge entry points, use the official Arbitrum chain reference.
// Arbitrum One: chain ID 42161 (decimal).
// Arbitrum Sepolia: 421614 (0x66eee), https://sepolia-rollup.arbitrum.io/rpc; explorer https://sepolia.arbiscan.io.
const params = [
  {
    "chainId": "0xa4b1",
    "chainName": "Arbitrum One",
    "rpcUrls": [
      "https://arb1.arbitrum.io/rpc"
    ],
    "nativeCurrency": {
      "name": "Ether",
      "symbol": "ETH",
      "decimals": 18
    },
    "blockExplorerUrls": [
      "https://arbiscan.io"
    ]
  }
];

try {
  await ethereum.request({ method: "wallet_addEthereumChain", params });
  // Adding a network does not guarantee that it is selected.
  await ethereum.request({
    method: "wallet_switchEthereumChain",
    params: [{ chainId: params[0].chainId }],
  });
} catch (error) {
  // The wallet may reject either request; keep the UI on its actual chain.
  console.error("Network request was not completed", error);
}
// Legacy Truffle configuration. HDWalletProvider and mnemonic are defined by the surrounding project.
module.exports = {
  networks: {
    arbitrum_one: {
      provider: () => new HDWalletProvider(mnemonic, "https://arb1.arbitrum.io/rpc"),
      network_id: 42161,
    },
    arbitrum_sepolia: {
      provider: () => new HDWalletProvider(mnemonic, "https://sepolia-rollup.arbitrum.io/rpc"),
      network_id: 421614,
    },
  },
};
How to deploy to the Arbitrum networks
The adjacent configuration uses the legacy Truffle format. Hardhat has a different configuration format, so it cannot use this object unchanged. For a new project choose a maintained toolchain and the current Arbitrum network settings.
A good practice I would recommend is writing your tests with Hardhat with a regular config, so you can run the tests fast and with console.log/stacktraces. And only occasionally use Truffle to run tests against a testnet.
The original Infura payment-dashboard instruction is historical. Use a documented public RPC or a provider that supports your chosen Arbitrum network, and check that provider’s current endpoint and account requirements.




Join the conversation
Comments are hosted by Disqus and load only when you choose to enable them.